Controling LED bulbs using Arduino UNO and Ultrasonic sensor.
Hey in this blog I want to show you, how to control LED bulbs using Arduino UNO and Ultrasonic sensor.
To do this project, what you need,
>>> Arduino UNO board.

>>> HC - 04 Ultrasonic Sensor.
>>> HC - 04 Ultrasonic Sensor.


>>> Jumper wires [ male to male ].

>>>Small bread board.
OK, then the connections,
CONNECTIONS
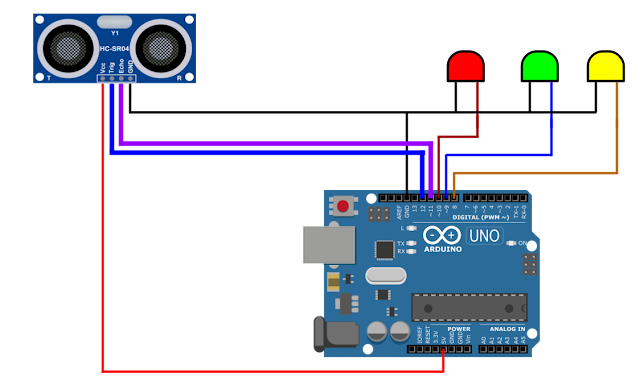
- Arduino board and Ultrasonic Sensor.

- Arduino board and LEDs.

- Full circuit diagram
Final output

- Arduino code is the second main part of our project ,
- You can write down the code or copy the code according to the following code.
Arduino Code
👇👇👇👇👇
#define echoPin 11
#define trigPin 12
long duration;
int x ;
void setup() {
pinMode(trigPin, OUTPUT);
pinMode(echoPin, INPUT);
pinMode(8, OUTPUT);
pinMode(9, OUTPUT);
pinMode(10, OUTPUT);
Serial.begin(9600);
}
void loop() {
digitalWrite(trigPin, LOW);
delayMicroseconds(2);
digitalWrite(trigPin, HIGH);
delayMicroseconds(10);
digitalWrite(trigPin, LOW);
duration = pulseIn(echoPin, HIGH);
x = duration * 0.034 / 2;
Serial.print("Distance: ");
Serial.print(x);
Serial.println(" cm");
if (x > 1 & x < 10) {
digitalWrite(8, HIGH);
digitalWrite(9, HIGH);
digitalWrite(10, HIGH);
}
if (x > 11 & x < 20) {
digitalWrite(8, LOW);
digitalWrite(9, HIGH);
digitalWrite(10, HIGH);
}
if (x > 21 & x < 30) {
digitalWrite(8, LOW);
digitalWrite(9, LOW);
digitalWrite(10, HIGH);
}
if (x > 30) {
digitalWrite(8, LOW);
digitalWrite(9, LOW);
digitalWrite(10, LOW);
}
}
After saving this code you can upload ,
Before uploading this code you must select your board and its port ,


How it works
if (x > 1 & x < 10) {
digitalWrite(8, HIGH);
digitalWrite(9, HIGH);
digitalWrite(10, HIGH);
}

if (x > 11 & x < 20) {
digitalWrite(8, LOW);
digitalWrite(9, HIGH);
digitalWrite(10, HIGH);
}

if (x > 21 & x < 30) {
digitalWrite(8, LOW);
digitalWrite(9, LOW);
digitalWrite(10, HIGH);
}

if (x > 30) {
digitalWrite(8, LOW);
digitalWrite(9, LOW);
digitalWrite(10, LOW);
}

Thank you for reading my blog
Test
ReplyDelete